Moving IIS URL Rewrite Rules to .NET Core: A Practical Guide
In the fast-paced world of web development, staying up-to-date with the latest technologies is crucial. As businesses evolve, so do their digital needs. One common challenge faced by developers is migrating URL rewrite rules from IIS (Internet Information Services) to .NET Core. If you're embarking on this journey, fear not! This guide will walk you through the process in a clear and practical manner.
Understanding the Basics
URL rewriting plays a crucial role in managing web traffic and optimizing user experience. It involves intercepting incoming requests and redirecting them to different URLs based on predefined rules. In the IIS environment, these rules are typically configured in the web.config file. However, with .NET Core, URL rewriting is handled differently, using middleware within the application itself.
Step 1: Assess Your Current Setup
Before diving into migration, it's essential to understand your existing URL rewrite rules configured in the web.config file. Take stock of each rule, noting down its pattern and rewrite destination.
Step 2: Install the Microsoft.AspNetCore.Rewrite Package
To handle URL rewriting in .NET Core, you'll need to install the Microsoft.AspNetCore.Rewrite package. This can be done easily using the .NET CLI or NuGet Package Manager in Visual Studio.
dotnet add package Microsoft.AspNetCore.Rewrite
Step 3: Configure URL Rewriting Middleware
Once the package is installed, you'll configure the URL rewriting middleware in the Startup.cs file of your .NET Core application.
using Microsoft.AspNetCore.Builder;
using Microsoft.Extensions.DependencyInjection;
using Microsoft.AspNetCore.Rewrite;

public class Startup
{
    public void ConfigureServices(IServiceCollection services)
    {
        // Add any necessary services here
    }

    public void Configure(IApplicationBuilder app)
    {
        // Other middleware configurations

        using (StreamReader iisUrlRewriteStreamReader =
            File.OpenText("IISUrlRewrite.xml"))
        {
            var options = new RewriteOptions()
               .AddIISUrlRewrite(iisUrlRewriteStreamReader);

            app.UseRewriter(options);
        }

        // Additional middleware configurations
    }
}
Step 4: Migrate URL Rewrite Rules
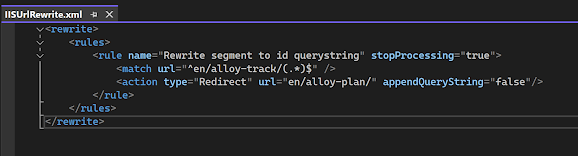
Now, it's time to migrate your existing URL rewrite rules from the web.config file to the IISUrlRewrite.xml file. You can keep the exisiting rewrite element with all your current iis rewrite rules in place, see the below.
Step 5: Test and Iterate
After migrating your rules, thorough testing is essential. Verify that all URLs are being rewritten / redirected correctly without any unexpected redirects or errors.
Conclusion
Migrating URL rewrite rules from IIS web.config to .NET Core as part of an CMS 12 upgrade may seem daunting, but with proper guidance, it can be a smooth transition. By following the steps outlined in this guide, you can ensure that your application's URL rewriting functionality remains intact while embracing the capabilities of .NET Core.
Remember, migration is an opportunity to optimize and improve your application for the future. So, embrace the change, and happy migrating!
Comments
Post a Comment